![PALUSA New Logo Transparent-1.png]](https://helpcenter.skywire.com/hs-fs/hubfs/PALUSA%20New%20Logo%20Transparent-1.png?height=50&name=PALUSA%20New%20Logo%20Transparent-1.png)
Creating the Reporting Database
In Skywire POS version 4.23 and all subsequent versions, the POS application will be posting sales directly to a reporting database via the WebConfig application interface. This will be used in the future to support custom reporting and speed up report generation. However, there are more prerequisites to get the POS application installed. The reporting database will need to be created on the client designated database server and the following instructions will detail how to create the database and install the prerequisites.
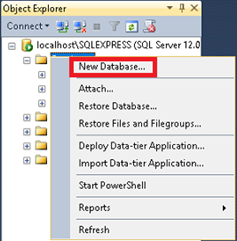
To create a new database for reporting, in SQL Management Studio, right click on the databases folder in the object explorer and select “New Database.”
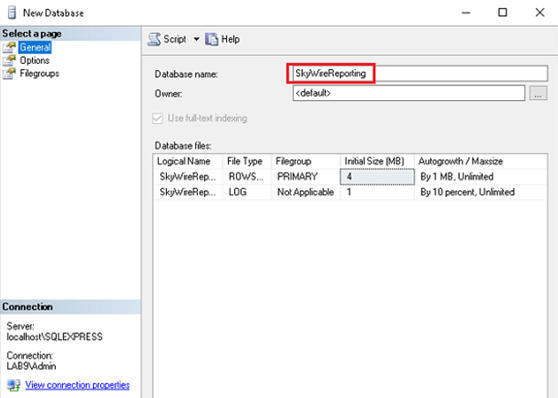
Name the database "SkyWireReporting."
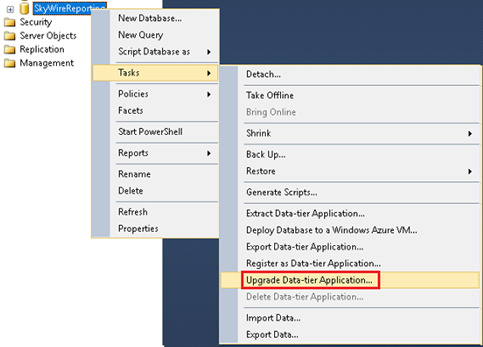
Apply the Data-tier Application Package (DACPAC) to the database. This will add the necessary tables to the database.

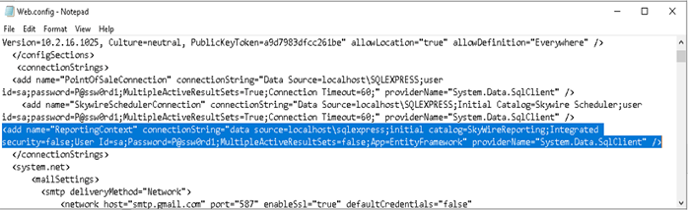
The connection string for the new reporting database needs to be added to the Web.config file located at ‘C:\inetpub\wwwroot\Webconfig.’ Insert the line below (in red) between the Skywire Scheduler Connection html tag and the ‘</connectionStrings>’ html tag. The SQL instance and password (highlighted portions) needs to be replaced with the SQL instance and password that the reporting database is contained in.
<add name="ReportingContext" connectionString="data source=localhost\SQLEXPRESS;initial catalog=SkyWireReporting;Integrated security=false;User Id=sa;Password=P@ssw0rd1;MultipleActiveResultSets=false;App=EntityFramework" providerName="System.Data.SqlClient" />
Items Needed for POS Install
Listed below are the required components for the Skywire POS:
Current version POS Installer. Find the latest version here: https://bit.ly/2Yxn53f
Install Latest POS Build
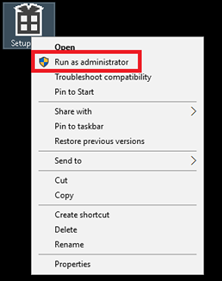
To install the POS, right click on the installer and run the installer as administrator
Once the installer starts up, it will attempt to validate that the RabbitMQ service is running, once successful, you will be prompted to input the database connection information along with the Webconfig/Deploy information. If the RabbitMQ service isn’t running, or the application isn’t installed, you will receive an error and the installation process will terminate.

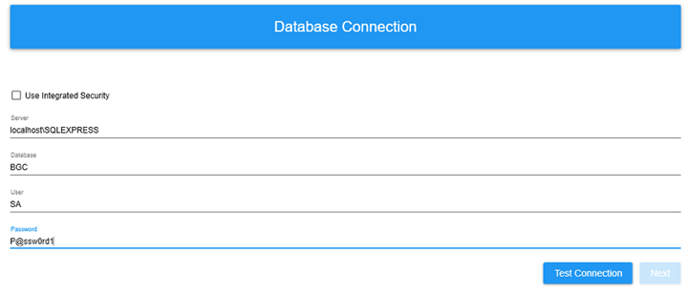
Once prompted for the database connection information, enter the SQL Server instance you want to connect to, the database you want to have the terminal access, and the database credentials as shown below. Be sure to click “Test Connection” at the bottom right corner of the connection input screen. You should get a message at the bottom of the screen that says, “Connection established.”

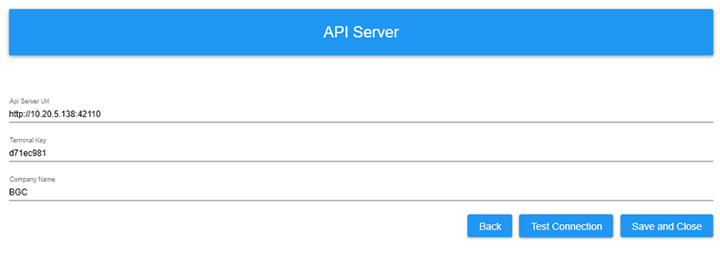
Click next to get to the API Server information. Enter the WebConfig URL, terminal key and company name (database name) then click “Test Connection” and verify that the connection is established there as well.

Once the database and server information has been entered in properly, you will see a validation screen and the POS application will initialize.