![PALUSA New Logo Transparent-1.png]](https://helpcenter.skywire.com/hs-fs/hubfs/PALUSA%20New%20Logo%20Transparent-1.png?height=50&name=PALUSA%20New%20Logo%20Transparent-1.png)
How to Create Force Modifier Groups
How to Create Exception Modifiers
How to Create Exception Modifier Groups
Forced Modifiers
Forced Modifiers are modifiers that automatically prompt after selecting a product. To achieve this, the Forced Modifier must be assigned to a group. Example, meat temperature for a steak. Meat temperature is the Forced Modifier Group and the actual temperature would be the Forced Modifier.
How to Create Forced Modifiers
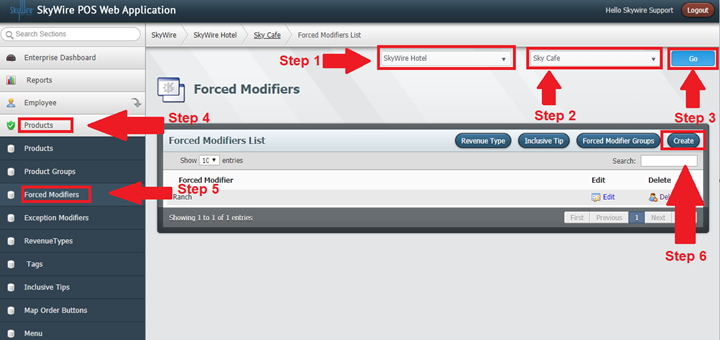
- Select a Property.
- Select a Profit Center.
- Select "Go.”
- Select "Products.”
- Select "Forced Modifiers.”
- Select "Create.”
Detailed description below.
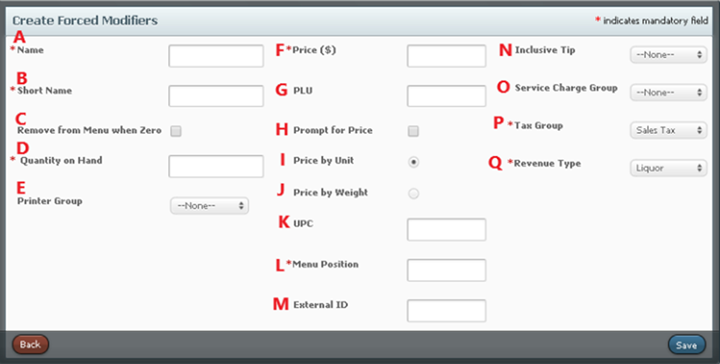
A. Name: Enter the name of the forced modifier.
B. Short Name: Shorthand name for modifier
C. Remove from Menu when Zero: Toggle this option to enable Countdown to Zero. Countdown to Zero will remove the modifier as a choice and will no longer be available to order.
D. Quantity on Hand: Enter the amount on hand. If you do not wish to use this function, simply enter 0 and do not select "Remove from Menu when Zero.”
E. Printer Group: Select the printer group the modifier prints to.
F. Price: Enter the price, if this is a priced modifier.
G. PLU: Enter the Price Look Up code, if applicable. (Optional)
H. Prompt for Price: Toggle this option to prompt for a price at the terminal, when the modifier is selected.
I. Price by Unit: Toggle this option to apply the price when selecting this modifier.
J. Price by Weight: Toggle this option if this modifier is priced by weight.
K. UPC: Enter the Universal Product Code, if applicable. (Optional)
L. Menu Position: Enter the desired menu position of the modifier. All modifiers can be assigned a number 1-100. The terminal will then show all modifiers in descending order.
M. External ID: Code used to map interfaces.
N. Inclusive Tip: Select an inclusive tip, if applicable. (Optional)
O. Service Charge Group: Select a service charge, if applicable. (Optional)
P. Tax Group: Select the tax group applicable to this modifier.
Q. Revenue Type: Select the revenue type.
- Select "Save.”
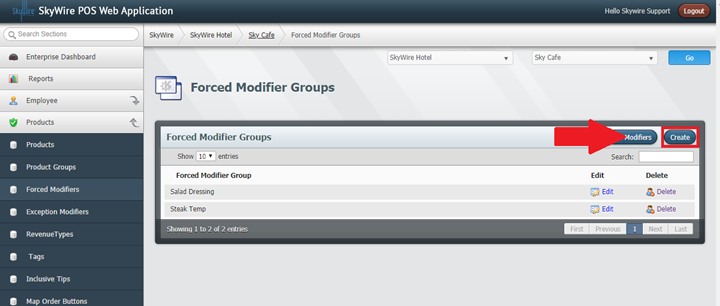
How to Create a Forced Modifier Group
- Select "Forced Modifier Group.”
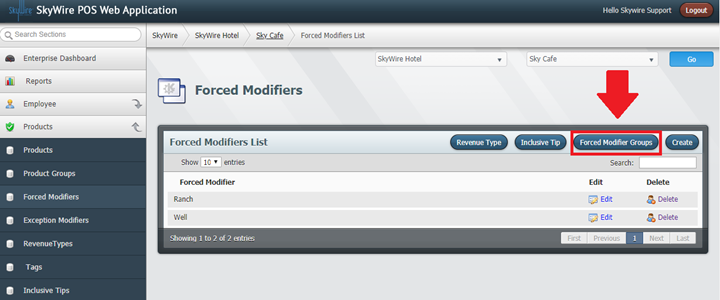
- Select "Create.”
Detailed description below.
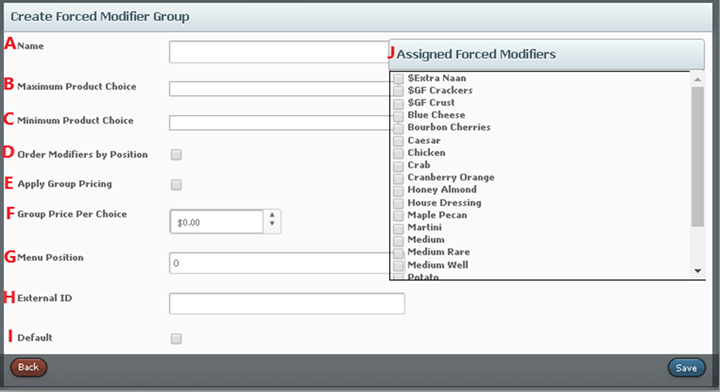
A. Name: Enter the name of the forced modifier group.
B. Maximum Product Choice: Select the maximum number of modifiers that can be selected when ordering products assigned to this group.
C. Minimum Product Choice: Select the minimum number of modifiers that must be selected when ordering products assigned to this group.
D. Order Menu Items by Positions: Toggle this option to enable menu positioning.
E. Apply Group Pricing: Toggle this option to enable group pricing.
F. Group Price per Choice: Enter the group price. All modifiers assigned to the group will apply this price.
G. Menu Position: Enter the desired menu position of the modifier. All modifiers can be assigned a number 1-100. The terminal will then show all modifiers in descending order.
H. External ID: Code used to map interfaces.
I. Default: Select this to set this forced modifier group as the default.
J. Assigned Forced Modifiers: Select the forced modifiers that belong to this group.
Exception Modifiers
An Exception Modifier is one that is optionally added to modify a product due to a special circumstance or request. Exception Modifiers are assigned to a group and then assigned to a menu.
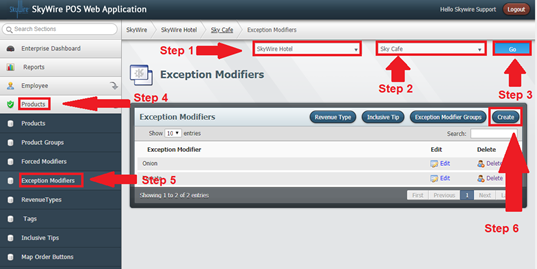
How to Create Exception Modifiers
- Select a Property.
- Select a Profit Center.
- Select "Go.”
- Select "Products.”
- Select "Exception Modifiers.”
- Select "Create.”
Detailed description below.
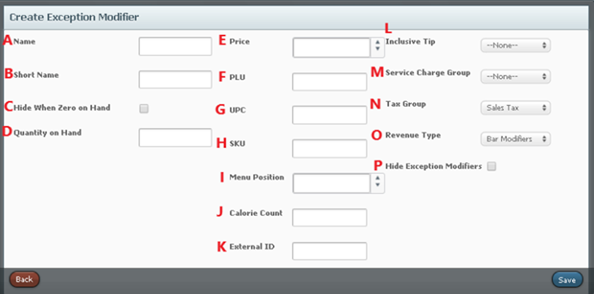
B. Short Name: Shorthand name to be displayed for modifier
C. Hide When 0 on Hand: Toggle this option to enable Countdown to Zero. Countdown to Zero will remove the modifier as a choice and will no longer be available to order.
D. Quantity on Hand: enter the quantity left in inventory
E. Price: Enter the price, if this is a priced modifier.
F. PLU: Enter the Price Look Up code, if applicable.
G. UPC: Enter the Universal Product Code, if applicable.
H. SKU: Enter the Stock Keeping Unit number if the modifier has a bar-code and a scanner is being used to ring the modifier.
I. Menu Position: Enter the desired menu position of the modifier. All modifiers can be assigned a number 1-100. The terminal will then show all modifiers in descending order.
J. Calorie Count: Enter the calorie content of the modifier.
K. External ID: Code used for mapping interfaces.
L. Inclusive Tip: Select an inclusive tip, if applicable.
M. Service Charge Group: Select a service charge, if applicable.
N. Tax Group: Select the tax group applicable to this modifier.
O. Revenue Type: Select the revenue type.
P. Hide Exception Modifiers: Toggle this option if this modifier should not print. The option needs to be toggled in the printer tab for the device it should not print.
- Select "Save.”
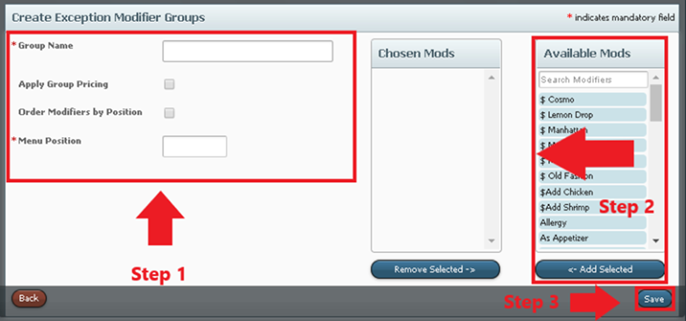
How to Create an Exception Modifier Group
- Select "Exception Modifier Group.”
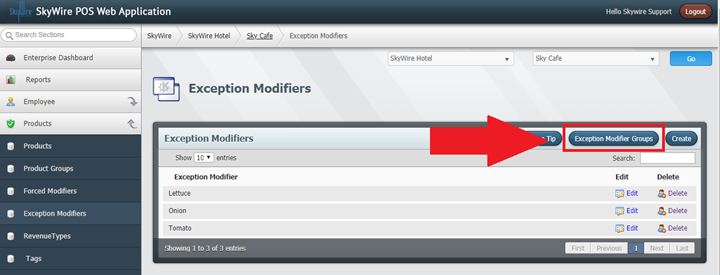
- Select "Create.”

- Enter the name of the Exception Modifier Group.
- Toggle this option to enable group pricing.
- Toggle this option to enable menu positioning.
- Enter the desired Menu Position of the modifier. All modifiers can be assigned a number 1-100. The terminal will then show all modifiers in descending order.
- Select the modifiers that belong to this group.
- Select the modifiers from the Available Mods window.
- Select "Add Selected.”
- Select "Save.”