![PALUSA New Logo Transparent-1.png]](https://helpcenter.skywire.com/hs-fs/hubfs/PALUSA%20New%20Logo%20Transparent-1.png?height=50&name=PALUSA%20New%20Logo%20Transparent-1.png)
Menu items are called Products in SkyWire POS. First, Product Groups are created to categorize and organize menu items. Products are then assigned to a group. The product groups will show as tabs on the POS terminal. End users will select the Product Group that the item is assigned to.
How to Create Product Groups
-
Select a Property.
-
Select a Profit Center.
-
Select "Go.”
-
Select "Products.”
-
Select "Product Groups.”
-
Select "Create.”

A. Enter the name of the Product Group.
B. Enter the desired Menu Position of the product group. All product groups can be assigned a number, 1-99. The terminal will then show all product groups in descending order on the POS terminal.
C. Toggle this option if this Product Group requires the user to verify the age of the guest.
D. Toggle this option if products in this group are ordered by weight.
E. Toggle this option if the products in this group can be discounted.
F. Toggle this option to use the group price.

Select "Save.”
A. Name: Enter the name of the product group.
B. External ID: Code used for mapping interfaces
C. Menu Position: Enter the desired menu position of the product group. All product groups can be assigned a number, 1-100. The terminal will then show all product groups in descending order on the POS terminal.
D, Require Age Verification: Toggle this option if this product group requires the user to verify the age of the guest.
E. Order Products by Position: Toggle this option if products in this group are ordered by position.
F. Can be Discounted: Toggle this option if the products in this group can be discounted.
G. Apply Group Price: Toggle this option to use the group price.
H. Default: Select to make this the default product group.
Select "Save.”
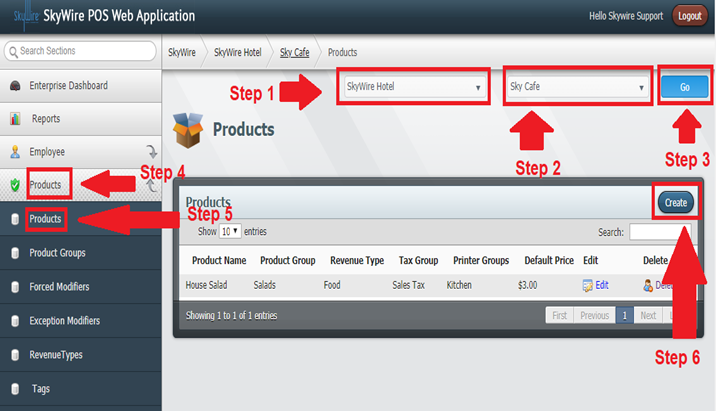
How to Create Products
-
Select a Property.
-
Select a Profit Center.
-
Select "Go.”
-
Select "Products.”
-
Select "Products.”
-
Select "Create.”
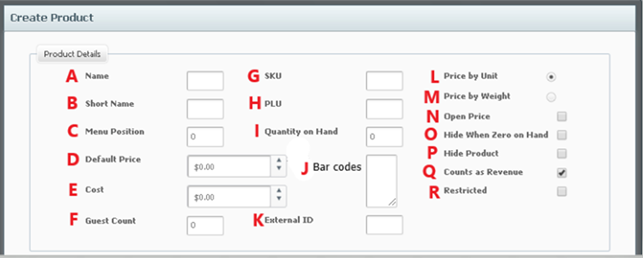
A. Short Name: Enter a short name for the product.
B. Menu Position: Enter the desired menu position of the product. All products can be assigned a number, 1-100. The terminal will then show all products in descending order on the POS terminal.
C. Default Price: Enter the price of the product.
D. Cost: Enter the cost of the product.
E. Guest Count: Enter the guest count if this product should count a cover when ordered.
G. SKU: Enter the Stock Keeping Unit number if this item is a bar coded item and a scanner is being used to order the item.
H. PLU: Enter the Price Look Up code, if applicable.
I. Quantity on hand: Enter the amount on hand. If you do not wish to use this function, simply enter 0 and do not select "Remove from Menu when Zero.”
J. Bar Codes: Enter the hex code if this item is a using a bar gun to ring the item.
K. External ID: Enter the external ID for mapping, if applicable.
L. Price by Unit: Toggle this option to use the default price.
M. Price by Weight: Toggle this option if this product is priced by weight and is using a scale to ring the item.
O. Open Price: Toggle this option to prompt for a price at the terminal when the product is selected.
P. Hide when 0 on Hand: Toggle this option to enable Countdown to Zero. Countdown to Zero will remove the modifier as a choice and will no longer be available to order.
Q. Hide Product: Toggle this option to hide the product from printing. The option must also be selected in the printer tab for the device.
R. Counts as Revenue: Toggle this option to count this product as revenue.
S. Restricted: Toggle this option for a manager override prompt when ordering this product.

A. Printer Group: Select a printer group this product should print to.
B. Tax Group: Select a tax group the product should apply when ordered.
C. Inclusive Tip: Select an inclusive tip, if applicable.
D. Revenue Type: Select the revenue type.
E. Surcharge Group: Select a service charge, if applicable.
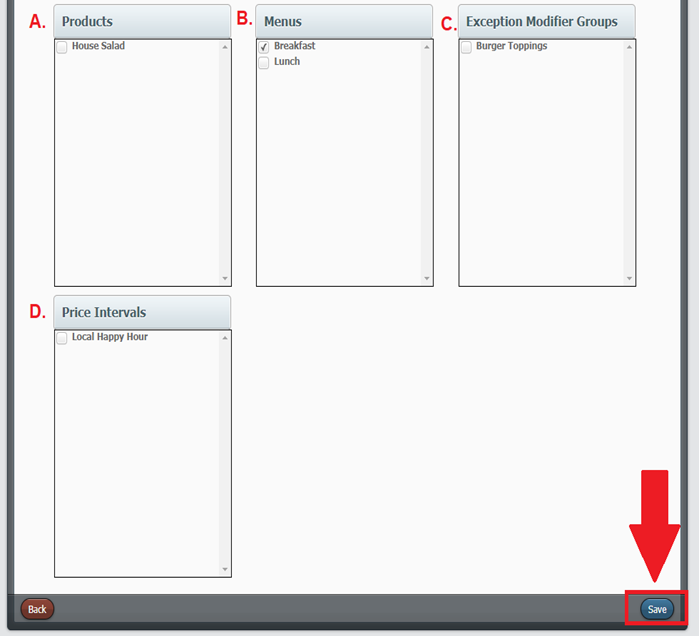
F. Product Groups: Select the product group (s) the product belongs to.
G. Forced Modifier Groups: Select the forced modifier groups that belong to this product. All available forced modifier groups will appear in the box. Select the one or multiple forced modifier groups you wish to apply to the product, followed by selecting by checking the box. The forced modifier group will then appear on the left chosen forced modifier groups field. You can also remove a forced modifier group by selecting the group followed by unchecking the box.
H. Tags: Select the tags that belong to this product, if applicable.
I. Price Level: Select a price level if this product needs additional pricing, if applicable.
Select "Save.”
How to Create a Menu / Menu Group