![PALUSA New Logo Transparent-1.png]](https://helpcenter.skywire.com/hs-fs/hubfs/PALUSA%20New%20Logo%20Transparent-1.png?height=50&name=PALUSA%20New%20Logo%20Transparent-1.png)
How to Create an Enterprise Level User
How to Create an Enterprise User
How to Create an Enterprise User Role
How to Create a Property Level User
How to Create a Profit Center User
How to Create Enterprise Level Users
Users can be created at the enterprise level, property level and profit center level. Enterprise Level Users will have access to all properties and profit centers.
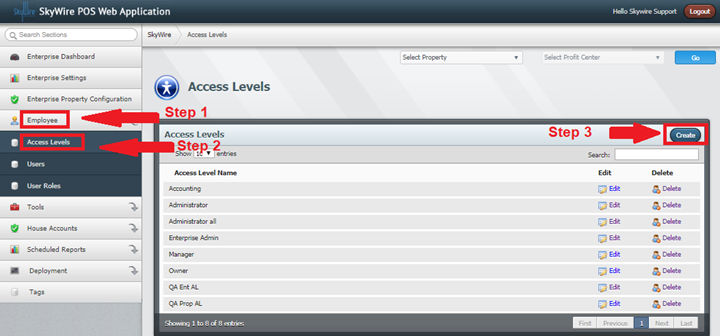
Create an Access Level
- Select "Settings.”
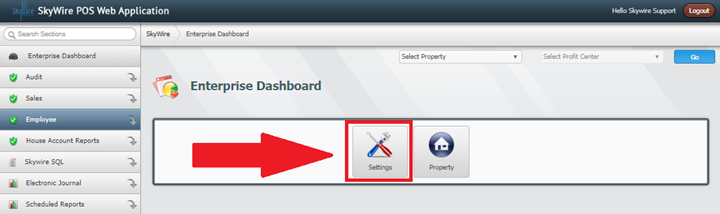
- Select "Employee.”
- Select "Access Levels.”
- Select "Create.”
- Enter the name of the Access Level.
- Select the functions that the role created can use. Use “Select All,” to enable all the access levels in the category. Uncheck access levels to disable them for the access level.
- Select "Save.”
See detailed Access Level descriptions below.

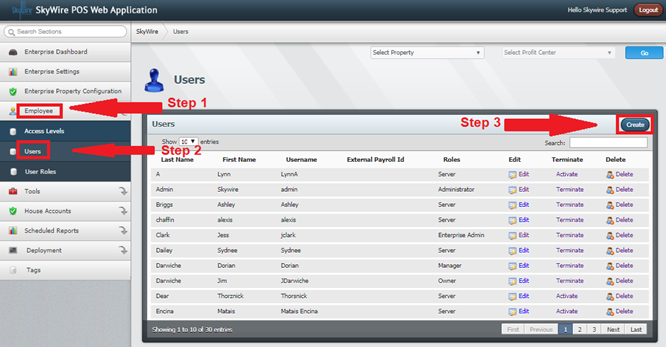
Create a Enterprise User
- Select “Employee.”
- Select "Users."
- Select "Create."
Detailed explanation below.
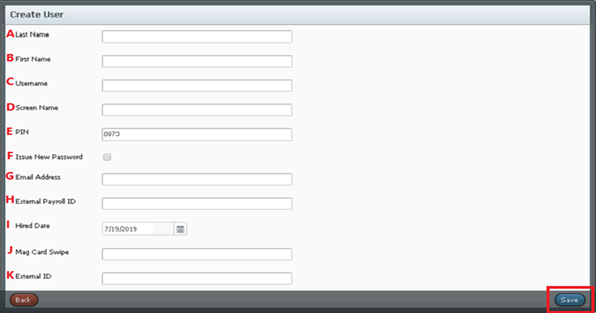
B. First Name: Enter the user’s first name.
C. Username: This is the name that is used to login to WebConfig, if allowed access.
D. Screen Name: This is the name that will display on the POS terminal when signed in.
E. PIN: This will be the number used to sign-in to the POS terminal. A password will automatically populate when a user is created but can be changed. Two users cannot have the same Front of House Password.
F. Issue New Password: Select this option when creating a WebConfig user. This will email a password and the user will be able to create a new password after signing in for the first time. Once the user is created, this option will change to reset password. Toggle this option and select "save" to issue a new password at any time.
G. Email Address: Enter an Email Address for WebConfig users only. This email address will be where the password is sent to.
H. External Payroll ID: This is used to track user by payroll number (Optional).
I. Hire Date: Enter the user’s start date.
J. Mag Card Swipe: This is the number of the swipe card used for sign-in (Optional).
K. External id: This is used to track the user by ID number (Optional).
Create a Enterprise User Role
User will not be visible on employee list until a Role had been created.
- Select "User Roles.”
- Select "Create.”
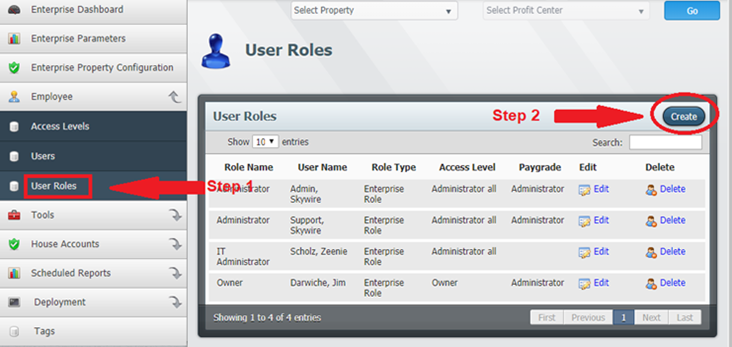
See detailed explanation below.
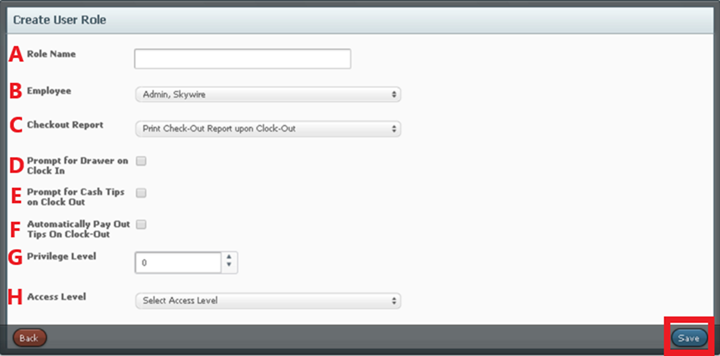
B. Employee: Select the user created.
C. Checkout Report: Select which report to print when ending shift.
D. Prompt for Drawer on Clock-In: This will prompt the user to select an available cash drawer. A cash drawer must be claimed to open for tenders configured to do so.
E. Prompt for Cash Tips on Clock-out: Toggle this option to give the user the opportunity to claim cash tips.
F. Automatically Pay Out Tips on Clock-Out: Toggle this option to have tips automatically paid out at the end of shift.
G. Privilege Level: Select a number from 0-10, 0 being the highest and 10 being the lowest level of privilege. Privilege levels dictate which users can apply tenders created. The privilege level is also configured in "Tenders.” Confirm the privilege level correlates with the users who need the ability to apply the tender.
H. Access Level: Select the access level created.
Select "Save.”
How to Create Property Level Users
Users can be created at the enterprise level, property level and profit center level. Property Level Users will have access to all profit centers in that property. All users will need an Access Level, User and User Role created or assigned. See “Enterprise Level Users.”
- Select a Property.
- Select "Go.”
- Select "Employee.”
- Create an Access Level.
- Create a User.
- Create a User Role.
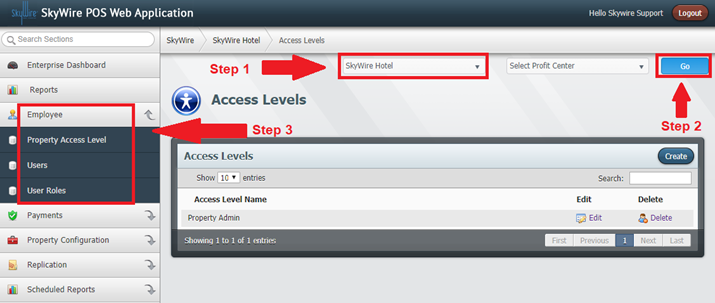
You have to create a User Role to connect to the User before they will show up in the users list.
How to Create a Profit Center Level User
Profit Center users will only have access to profit center they are configured in. All users will need an Access Level, User and User Role created or assigned. See “Enterprise Level Users.”
- Select a Property.
- Select a Profit Center.
- Select "Go.”
- Select "Employee.”
- Create an Access Level.
- Create a User.
- Create a User Role.
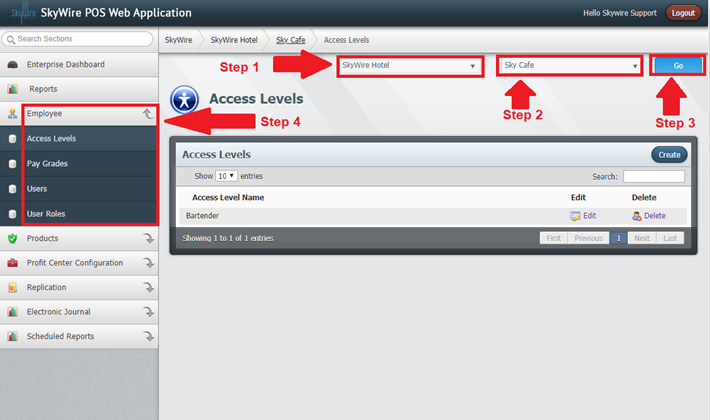
You have to create a User Role to connect to the User before they will show up in the users list.
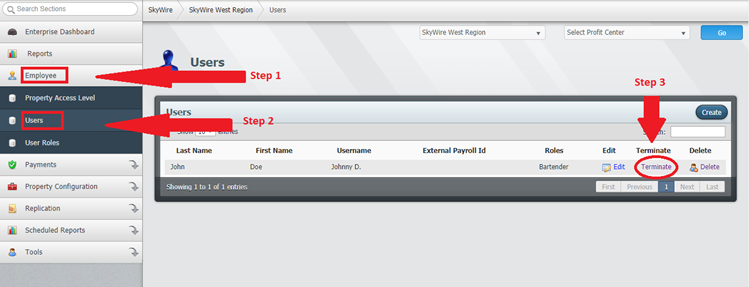
How to Terminate a User
When terminating or deleting a user, best practice is to edit the user name and email address to avoid future conflicts.
- Navigate to the user being terminated. They may exist in the Enterprise, Property or Profit Center.
- Select Employee
- Select User
- Select Terminate
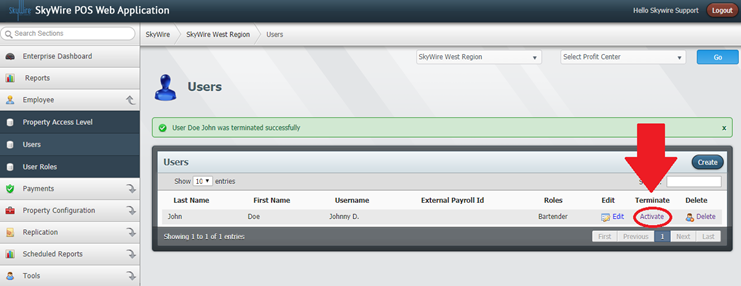
If an employee is needs to be re-activated, select Activate.
If you are still have issues with this and require assistance, please reach out to our Support Line at -866-514-5888 option # 2